Windows 11 Tutorial
How to Scan for Hardware Changes?
🔺 Speed Scroll 🔺
If you’ve recently installed new hardware or made updates to your system, knowing how to scan for hardware changes on Windows 11 can help your computer recognize and configure new devices. This can be easily done using the Windows 11 device manager. By performing a hardware scan, Windows will automatically detect and install the necessary drivers, ensuring that everything runs smoothly. In this guide, we’ll walk you through the steps to detect hardware changes on Windows 11 and keep your system up to date.
- TABLE OF CONTENTS
When Should You Do a Hardware Change Scan?
When installing new devices, windows autoloader automatically downloads the driver, but can often not be detected because of a malfunction or conflict with another device. It is also crucial to scan for hardware changes following the addition or updating of a new device. This can assist in solving the Windows problems like the black screen issues or BSOD.
Method 1: Scan for Hardware Changes Using the Device Manager
Device Manager is a Windows utility that comes with the operating system; it enables users to see and control hardware devices attached to the system. It is a necessary tool for fixing errors, driver updates, and in this context, to examine the hardware’s changes.
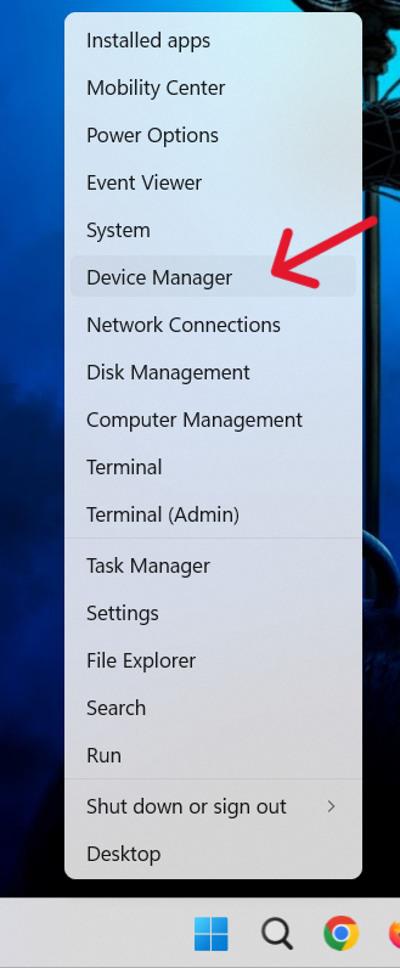
Step 1: Right-click on the Start button. Choose “Device Manager” from the context menu.
Step 2: In the Device Manager window, locate and click on the “Action” menu at the top. (Make sure you have selected at least one driver by clicking on that driver)
Step 3: From the “Action” menu, select “Scan for hardware changes.” or right-click on any driver then click on “Scan for hardware changes.“

Step 4: Windows will start scanning for any changes in hardware configurations. The process may take a few seconds.
Method 2: Scan for Hardware Changes Using Command Prompt
Step 1: To open the Command prompt use the shortcut Win + S then on the search bar type “CMD” from the right-hand side and select “Run as administrator“

Step 2: Type the following command and press Enter:
pnputil.exe /scan-devices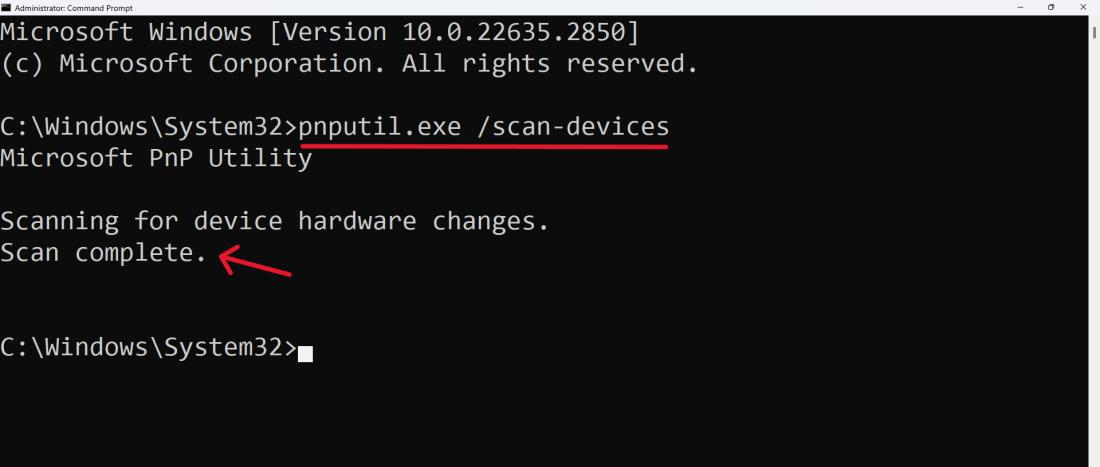
After completion, you will see a message “Scan complete“.
Conclusion
Performing a scan for hardware changes on Windows 11 is a quick and effective way to make sure your computer recognizes newly installed components or peripherals. By following the steps outlined, you can ensure your system remains up to date with all hardware adjustments. The Windows 11 hardware scan feature in the device manager simplifies this process, making it accessible even for beginners. Keep this technique handy for future hardware updates and troubleshooting.
How to Scan for Hardware Changes on Windows 11 – FAQ’s
How do I scan for hardware changes on Windows 11?
To scan for hardware changes on Windows 11, open device manager, right-click on the main computer name at the top, and select Scan for hardware changes. This will detect any new or updated hardware.
Why should I scan for hardware changes in Windows 11?
Scanning for hardware changes on Windows 11 ensures that any new devices or components you’ve installed are properly recognized and configured by the system. It’s an important step after hardware installation or updates.
How often should I perform a hardware change scan?
You should check for hardware changes whenever you install new hardware or are having difficulty with device recognition. Moreover, regular checks would be useful in keeping the system up-to-date.
Will searching for a hardware change impact my current files and settings?
No, scanning for hardware changes is not intrusive in the sense that it just looks for the new/removed one. It does not change your pre-existing files and settings.
Linux

Linus Tools

Check out different Linux distros in your web browser with nothing to download at DistroSea.com

Here are some cheatsheets and quick references from QuickRef.ME

Learn Linux from MIT for FREE
edX.

Linux Basics YouTube Series
6 videos
Watch the Series.

“Linux Command Line & Bash Scripting Tutorial For Beginners"
176 videos
Watch the Series.
Java Tutorial For Beginners: - Step by Step tutorials.
133 videos
Watch the Series.