Windows 11 Tutorial
How to Create Bootable USB Drive
🔺 Speed Scroll 🔺
Creating a bootable USB rive is essential for installing or reinstalling Windows 11 or Windows 10 especially if you’re facing an issue with your system. Whether you’re upgrading from an older OS, troubleshooting a corrupted system, or setting up a new PC, this guide covers the best proven methods to create a bootable USB drive.
- TABLE OF CONTENTS
- How to Create Bootable USB Drive For Windows 11 – FAQ’s
This guide will walk you through creating a bootable USB for Windows 11, ensuring a quick, hassle-free setup.
Prerequisites:
- USB Drive (with atleast 8GB of storage)
- Windows 11 (with product key)
- Administrator Access
- Compatible Device
- Internet Connectivity
- TPM 2.0 & Secure Boot
Method 1: Using Media Creation Tool
This is one of the safest and easiest method to start Windows 11 installation using USB from its official website. Here’s how you can do it:
Step 1: Download the Windows Media Creation Tool
You can visit the official website and select “Create Windows 11 Installation Media” file to download in your Windows 11 PC.
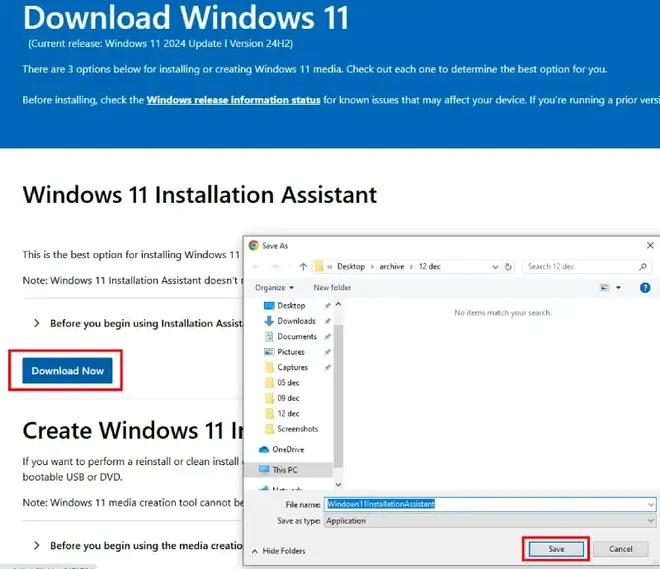
Download Media Creation Tool
Step 2: Run the downloaded Media Creation Installer
Once you select the path, click on “Save”. Now, make a double-click to start the Windows 11 installer in your system. Start the Installation process and accept the License & Terms to proceed.
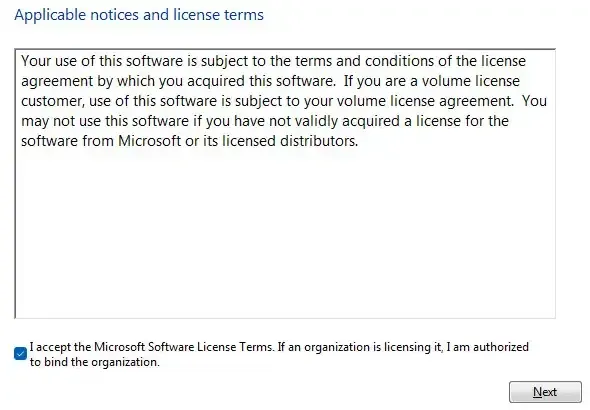
Windows 11 License Terms
Step 3: Select the Compatible Installer
Once you click on “Next” after agreeing the License and terms, choose the language (English – United States), compatible Windows edition and architecture (32 or 64 bit).
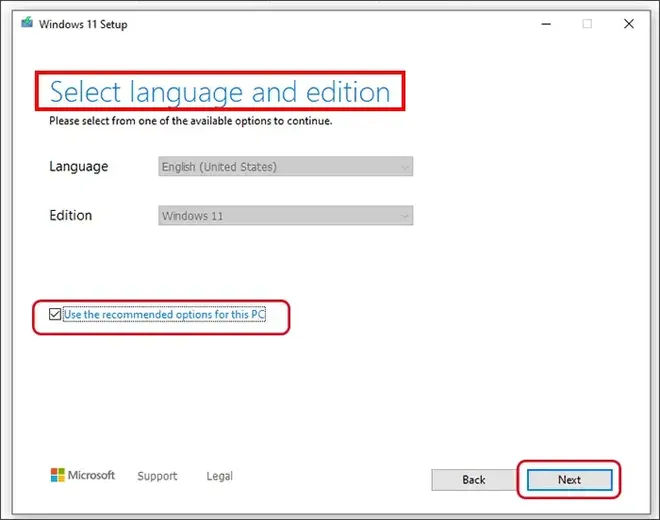
Select Language
You can check the your device configuration by navigating through Win + S (to open Search menu) and type System Information, click to open it and from there you can check all your system configuration. (also if you choose not to select any version, your system might pick by default the compatible version.
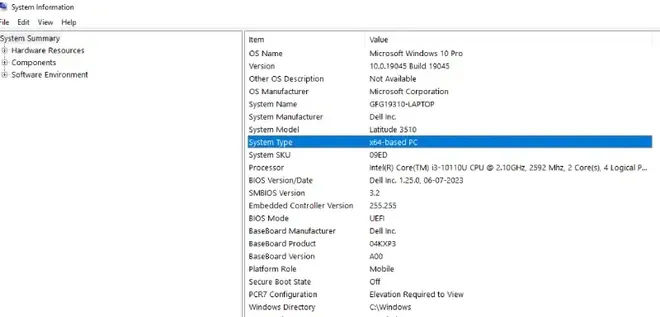
System Info
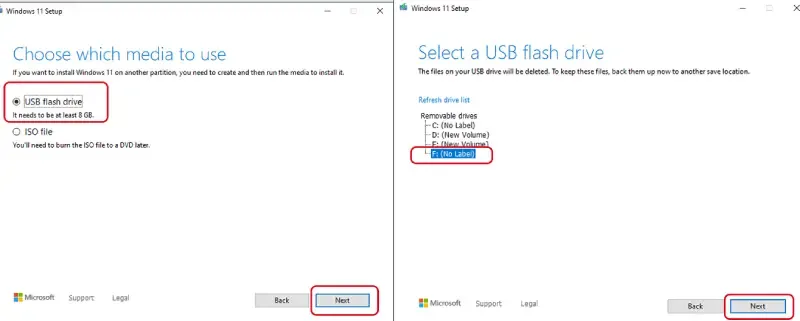
Step 4: Insert USB Drive and Create the Bootable Drive
Plug in your USB drive in the computer and select “USB Flash Drive” as the media type to use. Click “Next” and wait till the download gets completed and create the bootable USB drive. Once finished, eject the USB drive.
Complete the Installation
Method 2: Create Bootable USB using Rufus
You can also create bootable USB drive using Rufus which is an open-source software, compatible for Windows, Linux, and other operating systems.
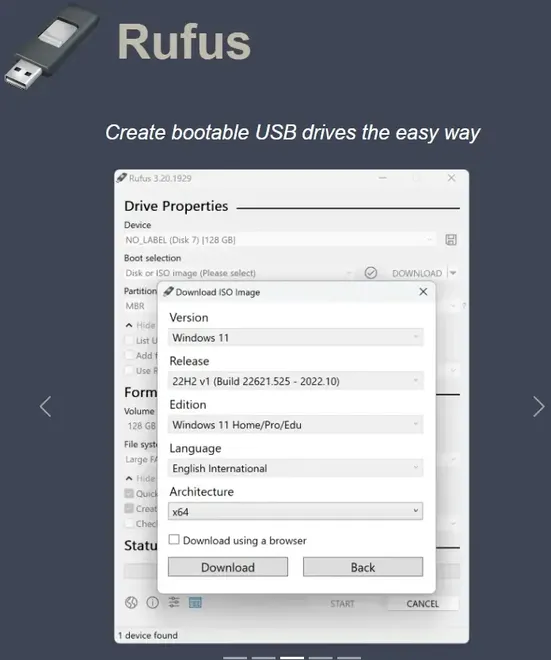
Step 1: Download Rufus .exe file
Visit the Official Rufus site to download the .exe file in your system or if you’re a Windows 10 user then you can also visit the Microsoft Store to download Rufus.
Rufus
Step 2: Insert the USB Drive & Prepare the Windows ISO File
Plug in the USB drive and select “USB Flash Drive” as the media type to use. Also, get the Windows 11 ISO file from it’s official website.

Windows 11 ISO file
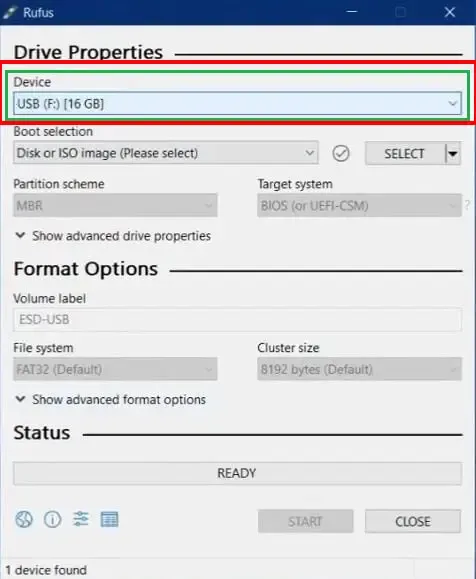
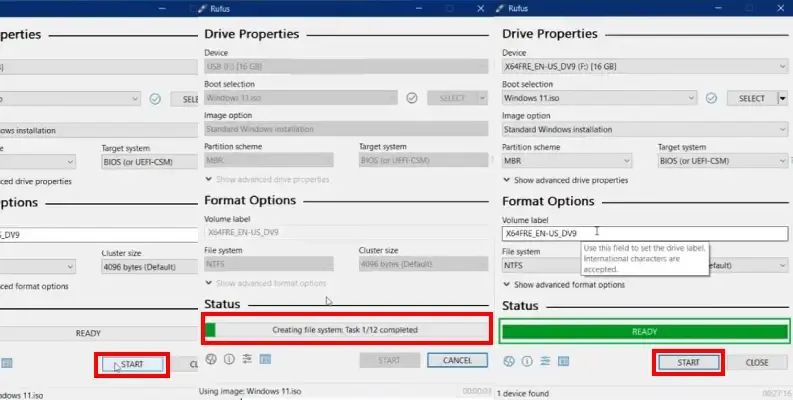
Step 3: Prepare the USB Drive
Start running the Rufus .EXE file, a pop-up will get open. Make a double-click and choose your USB device name under “Device”.
Select Device type
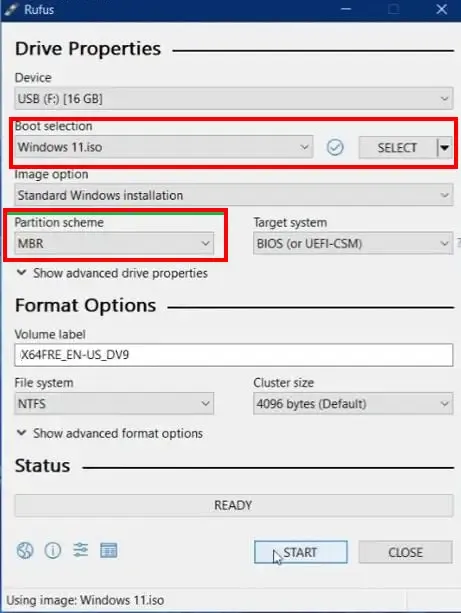
Step 4: Select the ISO File and add a Partition Scheme
Go to “Boot Selection” and select the ISO file and click on partition scheme. A drop-drown will appear with MBR (for old BIOS-based system) and GPT (for modern PCs). Ensure to make the selection carefully to avoid any interruption.
Drive Properties
Step 5: Complete the Booting Process
Note: Do not Power-off or eject USB device during this process as this may cause failure.
Click on “Start” and wait for sometime. Once the installation gets completed. You’ll see the status as GREEN “READY”. Click on start and eject the device. Your USB is ready..!!
Booting Complete
Method 3: Using Command Prompt (Diskpart)
This method is for advance users who are comfortable with command-line tools. If you’re looking for an alternative method to create a bootable USB, here’s what you need to do:
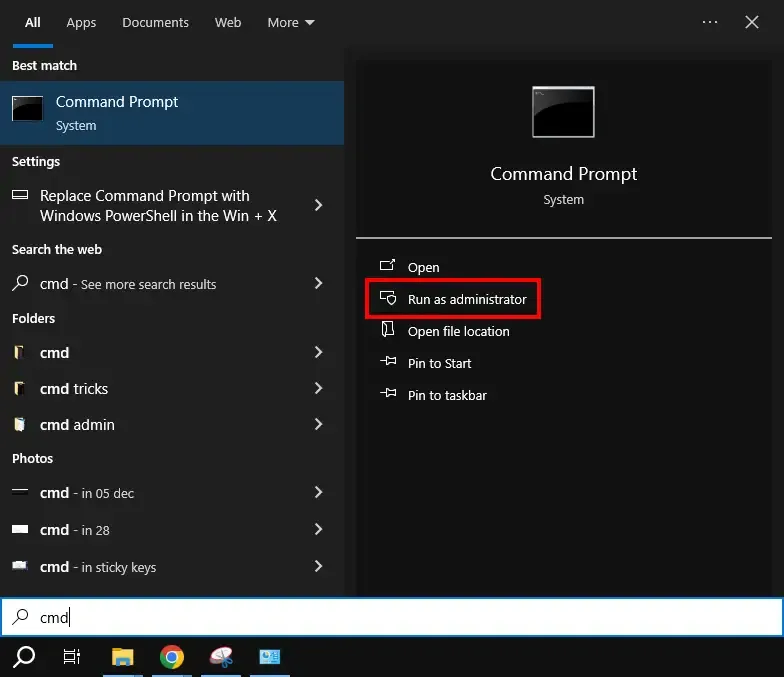
Step 1: Open Command Prompt as Administrator
Press Win + S and type CMD and select “Run as Administrator”. Alternatively, Press Win + X and select “Command Prompt as Administrator”.
Run Command Prompt as admin
Step 2: Run Diskpart and Prepare the USB Device
Now type and run the following command in CMD:
diskpart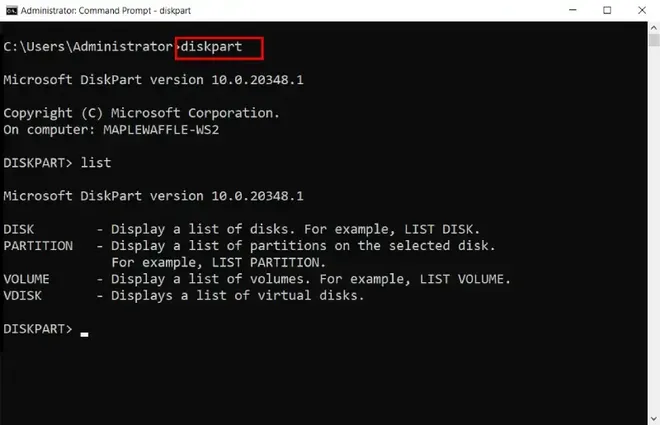
Diskaprt
Now, type list disk (to check all the connected drives) and type select disk i (‘i’ is an external device here) and start formatting using the following command:
clean
create partition primary
select partition 1
format fs=ntfs quick
active
assign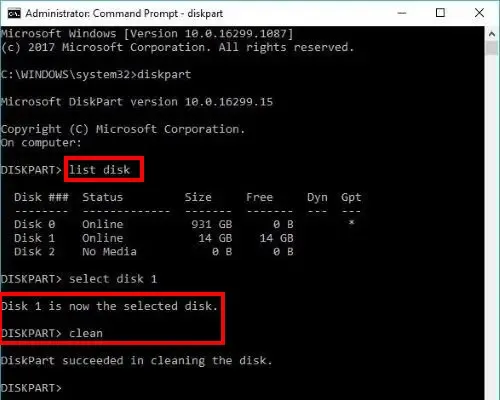
Disk clean
Step 3: Prepare the Windows 11 ISO Files
Mount the ISO file by making a right click and copy all the contents to the USB drive. The command line should look like this:
PowerShell Mount-DiskImage -ImagePath “C:\PATH\Windows 11.iso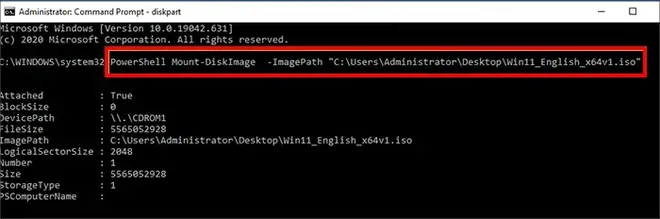
Mount
Step 4: Copy the Windows 11 ISO File to the USB drive
Run the following command to copy the ISO files to the USB drive and wait for the Installation to get completed.
robocopy J:\ X:\ /E /xf install.wim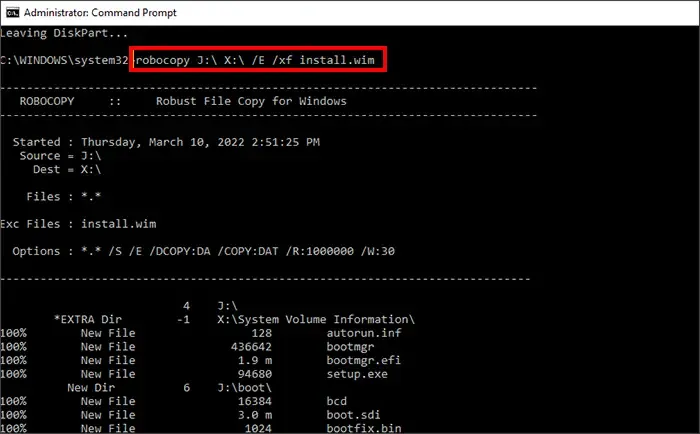
Copy ISO
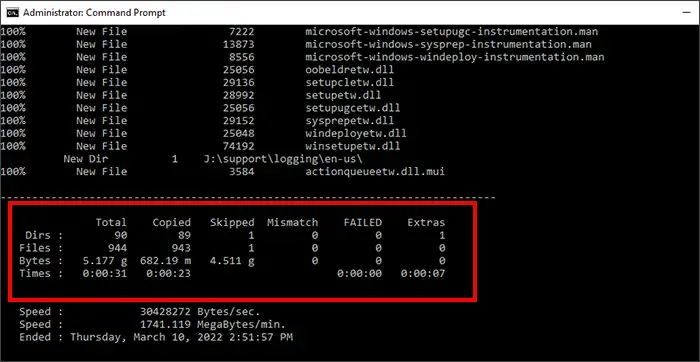
Once the process is complete, save and exit.
Wait and exit
Alternate Methods:
You can also use Third-party applications to perform a clean and safe USB booting for Windows 11. Below are some of the well-known software to perform this action:
- MyRecover
- iSunshare
Tips & Tricks
Once you create the bootable USB Drive in Windows from any of the provided method, you need to follow these steps to install Windows 11 in your system.
- Restart your PC and press F12, F2 or Del (depending upon the brand) during Startup
- Select the inserted USB drive to boot from.
- Follow the on-screen instructions to get a fresh Windows 11 installation in your machine.
General Troubleshoots
1. USB Not Detected (USB Device not recognized)
- You can try connecting with a different port (preferably USB 3.0)
- Try to format the drive to NTFS using Windows Disk Management.
2. Boot Failure
- You can enable UEFI Boot and disable Legacy Mode in BIOS
- To access it, press Del/F2 during Boot
- Verify ISO integrity using SHA-256 checksum
3. Windows Cannot Install to This Disk
- Run this command to convert into GPT (erase all data) using the Command Prompt:
diskpart > list disk > select disk [number] > convert gptNote: Admin access required to perform this action
Conclusion
Creating a bootable USB drive from ISO using Media Creation Tool, Command Prompt, Rufus or any third-party tool is a simple and efficient way to install or recover your Windows 11 PC. Whether you’re a beginner or an experienced user, using these methods to create a Windows 11 bootable drive will ensure a smooth installation process. Make sure to keep your USB drive ready for any future installations or recovery needs.
How to Create Bootable USB Drive For Windows 11 – FAQ’s
How do I create a bootable USB drive for Windows 11 using the Media Creation Tool?
Step 1: Visit the official Windows 11 download page.
Step 2: Download and run the Media Creation Tool.
Step 3: Select Create installation media (USB flash drive, DVD, or ISO).
Step 4: Insert a USB drive with at least 8GB capacity.
Step 5: Follow the on-screen instructions to create the bootable USB.
How do I create a bootable USB drive for Windows 11 using Rufus?
Step 1: Download and install Rufus from its official website.
Step 2: Insert a USB drive and open Rufus.
Step 3: Select the Windows 11 ISO file and choose your USB drive under the Device section.
Step 4: Click Start and wait for the process to complete.
What are the system requirements for creating a bootable USB for Windows 11?
- A USB drive with at least 8GB of storage.
- Windows 11 ISO file or the Media Creation Tool.
- A computer with administrator privileges.
How to boot from USB on HP/Dell/Lenovo Laptops?
- HP: Press F9 (during startup)
- Dell: Press F12 (during startup)
- Lenovo: Either Press F12 or Press Enter + I (BIOS settings)
Can I use the same USB drive for both Windows 10 and Windows 11 installations?
No, each USB drive can only old one version of the Windows installation files. You are required to separate USB drives for each versions.
Is it Safe to use Rufus for creating a bootable USB drive?
Yes, Rufus is one of the most trusted, safe and an open-source tool used for creating bootable USB drives. You just need to ensure that you’re downloading it from its official website only.
Linux

Linus Tools

Check out different Linux distros in your web browser with nothing to download at DistroSea.com

Here are some cheatsheets and quick references from QuickRef.ME

Learn Linux from MIT for FREE
edX.

Linux Basics YouTube Series
6 videos
Watch the Series.

“Linux Command Line & Bash Scripting Tutorial For Beginners"
176 videos
Watch the Series.
Java Tutorial For Beginners: - Step by Step tutorials.
133 videos
Watch the Series.