Raspberry Pi Tutorial
Raspberry Pi As a Media Center
🔺 Speed Scroll 🔺
Back to Raspberry Pi Tutorials

Raspberry Pi as a Media Center: Complete Guide for Beginners
You’ve considered ditching your old radio, satellite TV, or cable subscription. But how can you switch to an all-digital setup without compromising on what media you can enjoy? In this overview, I’ll show you how to cut the cord and do it in style with Raspberry Pi.
The Raspberry Pi can be transformed into the ultimate media center. With the right software, it can serve movies, TV shows, live TV, and music to other devices in the home.
You’re in for a treat as this is one of my favorite ways to use a Raspberry Pi. I’ll start by covering the best media software to choose from. Then, I’ll cover how to get videos and music onto your Pi. Finally, I’ll discuss how to hook everything up so you can start living the good life.
Table of Contents
- Start Here: Choose a Media Center Software
- Get the Hardware
- Put Media onto Raspberry Pi
- Sit Back and Enjoy
Start Here: Choose a Media Center Software
In the olden days of yore, we referred to this project as building a Home Theater PC (HTPC). You would have to manually transfer files onto a computer (via USB for example), plug the PC into a TV, and then hit play.
Today, it’s more convenient and streamlined than ever: a media server sits on your network and sends entertainment to any device in your home. You manage it all from a single place, and it also keeps track of what you’ve played, so you can resume from wherever you want.
The Raspberry Pi is a rock-solid device that’s perfect for this role.
To turn your Pi into a media server, you must install media center software.
You have quite a few choices here but aim to choose one to keep it simple.
I’ll briefly introduce the best options and why you might want each one.
Plex

Plex is a media server that can play movies, TV shows, music, and comic books, integrate online streaming services, and even access live TV channels.
This one’s my personal favorite. What converted me to Plex was how easily it made organizing my media library. It automatically detects files and can even grab subtitles for difficult-to-recognize sources like anime and foreign films. It saves me a lot of time compared to my old setup.
You play media locally across devices on your home network and share your library remotely with friends or family (if your internet connection is fast enough).
Plex’s jam-packed features can be a downside. I think it’s rather overwhelming for newcomers at first. But after getting it set up properly, it’s the one software that does everything I want.
If Plex sounds like the one for you, follow our guide to getting started with Plex media server on Raspberry Pi.
Jellyfin

Jellyfin is an all-in-one media server that’s open-source and 100% free.
It’s a great FOSS alternative to Plex, as Jellyfin can do many of the same things. For instance, Jellyfin offers unlimited playback quality on all mobile devices without purchasing apps.
In addition, it has free hardware transcoding, which is usually a premium-supported feature elsewhere. Lastly, there are no device limits, and you don’t need an internet connection to log in.
If Jellyfish is your jam, check out our guide on how to install Jellyfin on Raspberry Pi.
Kodi

Kodi was the “OG” media center that I used to run. Although Plex and Jellyfin are superior media servers, Kodi still has a place in today’s ecosystem.
Kodi is a media center that shines for a specific use case: local playback on a single device.
You can put Kodi on a Raspberry Pi and connect its HDMI port directly to a dumb TV. Now your Pi is a set-top box that’s taught your old TV new tricks. On-device playback means Kodi has faster response times and doesn’t need a network connection.
The best way to get started is to flash an OS dedicated to Kodi onto your Raspberry Pi. You have two routes to choose from here: OSMC vs LibreElec. Whichever one you decide on, we have a guide for you:
- (LibreELEC) Installing Kodi on Raspberry Pi: A Complete Guide
- (OSMC) The Ultimate Guide to Install Kodi on Raspberry Pi
Volumio
Maybe you don’t need the extra fuss of video and only want audio playback.
If so, check out the next two software options on our list.
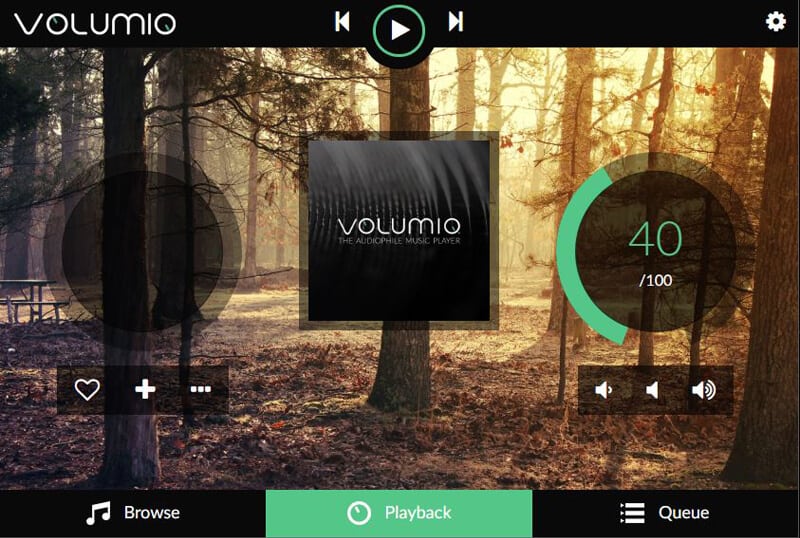
Volumio is an OS that turns your Pi into a sleek and dedicated music server.
It can unify multiple sources, such as MP3s, CDs, or even Spotify.
You control Volumio via a local web interface or its mobile app. It lets you stream music to any device and even get playback in up to six rooms simultaneously. Volumio also has an algorithm that will conjure up playlists using your music sources to match your mood.
MoOde

Although I still don’t know how to pronounce MoOde, I do know that it aims to be something more than a simple music player.
MoOde is a music server with audiophile-grade settings but is free and open source.
MoOde feels like something a music purist would design. The front end is a simple music player UI that you control via a local web interface. Hidden in the back, however, is an advanced configuration menu that will let you tweak audio settings to your heart’s content.
Once I figured out how to get it working, I was blown away by the sound coming out of my little Raspberry Pi.
Wait, I have some recommendations for you!
Before you go any further, I want you to take a look at some of the recommendations I’ve handpicked for you. I think these are essential items you should have for your Raspberry Pi. You can check them out and buy them directly from Amazon.
| A silent and convenient case | A cool SSD for increased performances | A nice monitor, to stop using the TV | A dedicated keyboard with touchpad |
Get the Hardware
Okay, the decision above was probably the hardest one to make. But now that you know what media center software you want, let’s loop back to ensure you have the right hardware for it.
Raspberry Pi
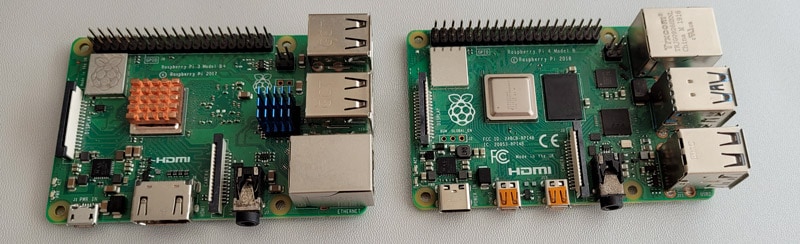
- Raspberry Pi model: I recommend the newer Raspberry Pi 5 or Pi 4 boards. They have the best CPUs and GPUs for digital media playback. That being said, older models can run the music servers just fine, or even Plex with some limitations.
- Memory: The amount of memory you need depends on whether you’re doing video or music only. I recommend 4 GB RAM, which should do anything you might want. But you can still manage with lower amounts if you’re not maxing everything out.
- Power supply: I recommend the official power supply.
- Ethernet: Media streaming needs to be fast and stable, so a wired connection is best. Having tried Wi-Fi for this task before, it might work, but I don’t recommend it.
- Storage: You’ll want a large-capacity drive that can hold a lot of movies and music. We’ll discuss more about this down below.
Display
Guess what? You don’t need anything here.
That’s because your Pi runs headless as a media server.
The device you’ll be playing from (e.g., smart TV, PC, smartphone) will provide the screen.
However, you may want to hook up Kodi to a single TV or connect digital speakers directly to the Pi for MoOde. In that case, you might need a micro HDMI cable. I recommend one that supports HDMI 2.1, so you don’t run into any unexpected drops in quality.
Storage
Although you could get away with using a microSD card for music or comic books, I recommend connecting traditional computer storage to media centers – especially if you plan on serving video and everything else.
You could use an SSD or NVME for this purpose. But even streaming 4K resolution video only requires roughly 25 mbps, so you don’t need the fastest drives.
Instead, I recommend looking for large-capacity drives. For example, if you’re aiming to host a mega library, it’s more cost-effective to get old-fashioned HDDs and connect them as external drives.
For digital hoarders out there who want a 20 TB or 100 TB array like I do, consider purchasing used drives from places like eBay or ServerPartDeals (although you’ll need to do some research).
Case

Did you know that if your Raspberry Pi overheats, it simply throttles itself? You might never notice with regular usage, but I find stutters unbearable for my media server.
To ensure your Pi stays cool, use a case that prevents overheating. The Flirc, Argon NEO, or Pironman cases are all great at this, and they make versions for different Pi models.
Put Media onto Raspberry Pi
All right, you’ve got the hardware and software up and running. But how do you get videos and music onto your Raspberry Pi? In this section, I’ll cover some broad ways.
Send Files to Raspberry Pi
The most obvious way to get stuff onto your media server is to put files (like .mkv video or .mp3 music) directly onto the Raspberry Pi’s storage.
Read next: Need a clear GPIO pinout diagram? Here’s mine.
For example, during Plex setup, you will designate which folder should hold movies and which folder should hold TV shows. If you move the files into the appropriate folder, and if those files are named somewhat accurately, Plex will automatically put them into your library.
That means when you open the Plex app from your tablet or smart TV, the movie or show appears in the user interface. The other media center software generally uses this same principle.
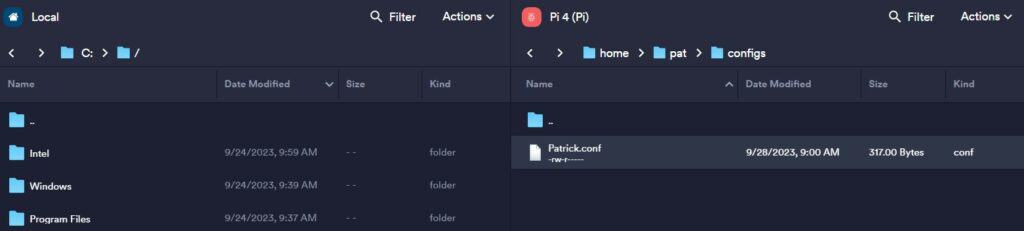
I usually handle this from a PC and then move the files to my Pi over the local network.
Here are some methods to transfer files to your Raspberry Pi:
- SFTP
- Samba
- OpenMediaVault
Connect Streaming Services
I also like to connect Netflix, Amazon Prime Video, and Spotify so that my media center is a one-stop shop. I don’t have to maintain different apps on every device, and I don’t have to switch apps when playing something locally versus streaming from a subscription service.
Each media center is different in how subscription service linkage works. For example, I can connect Hulu directly to Plex by entering my login details.
Other times, it may require a plugin.
Live TV/Music

Live TV is the hottest new feature for media centers. That means I can watch local news, or have something like World’s Funniest Home Videos playing in the background while making brownies.
How do you get live TV channels? Well, for apps like Plex, it’s built right into the app. You don’t have to do any fancy configuration. For Volumio, you can add internet radio stations.
Not every local channel is offered. But you can change that by adding a Raspberry Pi TV HAT and linking it to your media center software. For the truly motivated, there are ways to record these broadcasts to watch later. It sure beats paying a monthly subscription for DVR.
Sit Back and Enjoy
Now that you’ve got the hardware, software, and media files ready to serve, how can you play them on different devices? Each media center does this differently, so check our guides for in-depth instructions.
But let me give you a broad idea of how it might work:
1. Hook your Pi media center up.
Plug your Raspberry Pi into your router or switch, connect its storage, and power it on.
2. On the device you want to watch/listen from, connect to the Raspberry Pi media center.
This might mean installing an app or accessing a web interface using the Pi’s IP address.
Here are some examples of different playback devices:
Also: No screen? No problem! Here’s how to setup a Pi without one.
- Smart TV: Install the app directly from your TV’s app store. For example, if you’re running a Jellyfin server on your Raspberry Pi, install the Jellyfin app on your TV.
- TV Streaming Device: The Roku Ultra, Apple TV 4K, Nvidia Shield TV Pro, Amazon Fire TV Cube all have official apps that connect to Plex, Jellyfin, or Volumio.
- Mobile Device: On phones and tablets, install the Plex or Jellyfin app from the app store. For Volumio or MoOde, connect to its web interface from a browser.
- Video Game Console: Believe it or not, you can use a PlayStation or Xbox for playback. The apps on these platforms have a reputation for being a little wonky, but if it’s the only hardware you’ve got, go for it.
- Dumb TV / dumb speakers: Connect Kodi or MoOde directly to act as its streaming player.
If your content plays, then you’ve succeeded! Your new Raspberry Pi media center will make accessing entertainment more convenient than ever, and it might even impress your family and friends.